3. Installing and Updating Device Drivers
Device drivers are the
controlling code actually interfacing the hardware components with the
operating system. The commands are specific to each piece of hardware,
and there may be different commands, memory locations, or actions even
within the same type of hardware. A network interface card (NIC) from
one vender may actually have a different set of instructions than a NIC
from a different manufacturer.
An operating system or
software works best when it can issue a standard command and have the
same functionality across the hardware regardless of vendor. This is
where drivers
come in; the driver takes a standard instruction from the operating
system and issues the command to the hardware to perform the desired
function.
Drivers need to be updated.
For example, a command set for a driver may perform a function
incorrectly. This can produce errors and would need to be fixed. The
hardware vendor will update the driver to fix the problem. Or new or
better functionality may be necessary or wanted, so the hardware vendor
would need to change the driver code to add functionality or provide
better performance, in turn leading to an update.
Typical first-time
installation of drivers today happens automatically with the Plug and
Play specification. After the hardware is installed, Windows 7 will
recognize it and launch the driver installation program. Let's take, for
example, the connection of a digital camera to the USB port of your
computer.
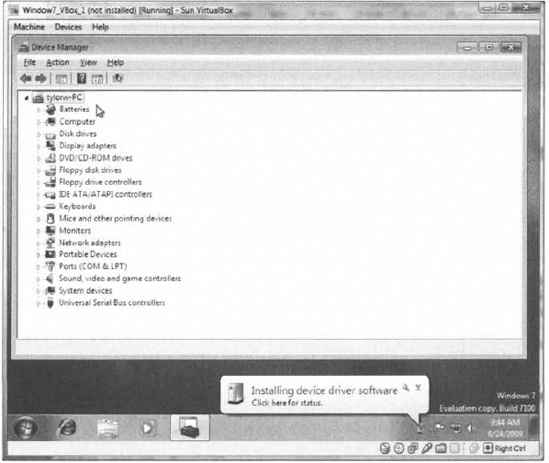
Windows 7 will recognize
that a device has been plugged in and will gather the information about
the USB device. Windows 7 will then install the best driver it knows
about (and if it doesn't know about the device, it will ask you how to
proceed). Figure 8 shows the message indicating that the operating system found a driver and is installing it automatically.
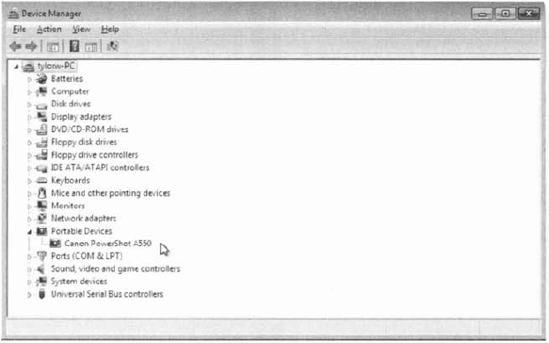
The installation completes and the device is now available in Device Manager, Figure 9 shows the digital camera as a hardware item you can now access as we did with the network adapter previously.
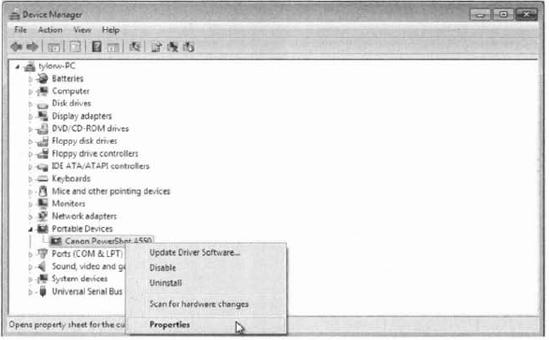
If you need to review the
driver details for your newly installed device, the digital camera in
this case, you can right-click the device in Device Manager and choose
Properties, Figure 10
shows the right-click menu (also known as the context menu); note that
the top choice in this menu is a quick launch to update the driver
software, if that's what you*re trying to do.
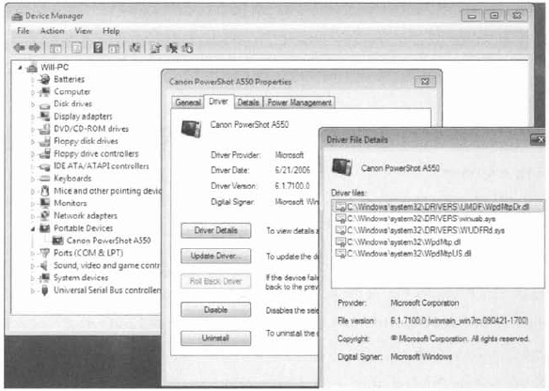
You may want to verify
general information about the driver, like the provider or version. You
can see that information in the driver tab of the Properties dialog box.
You can also choose to view the driver details, which are the
supporting files and associated paths. Figure 11
shows the Properties dialog box of the digital camera after the Driver
tab has been selected and the Driver Details button clicked.
Sometimes when you're having
issues with a hardware device, you will go online and read forums or
search engine queries for ideas from other administrators. Someone might
mention that they had a problem with a specific driver for the hardware
you're researching. They might even mention the exact version of the
driver and suggest a fix. Having the ability to view information on
drivers and update them is helpful in a situation such as this. Exercise 4 walks you through looking at driver details.
|
Follow these steps to view the details of a device driver:
Choose Start => Control Panel => Hardware And Sound => Device Manager (or type device manager in the integrated search window). Click
the triangle next to the category in which you want to view driver
details to expand the item list; you can also double-click the category
name. For example, double-click the category Portable Devices to see the
portable devices connected to the machine. Right-click the hardware item (e.g. Cannon PowerShot A550) and select Properties. Click the Driver Details button to see the files associated with the hardware.
|
Another task may be updating the drivers. In Exercise 5 we will look at updating a driver.
Choose Start => Control Panel => Hardware And Sound => Device Manager (or type device manager in the integrated search window). Click
the triangle next to category for which you want to update the driver
to expand the item list; you can also double-click the category name
(e.g., double-click Portable Devices as a category to see the portable
devices connected to the machine). Right-click the hardware item (e.g. Cannon PowerShot A550) and select Properties. Click the Update Driver button; a window launches asking how you want to search for the driver.
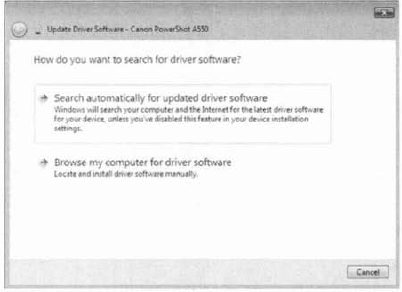
Choose
Search Automatically For Updated Driver Software to have Windows 7
search for you, or you can choose Browse My Computer For Driver Software
if you have the new drivers already. Windows 7 searches for and update the drivers or reports back that you have the most current version.
|
Not only will you update
drivers because of a failure or hardware issue—you will install new
drivers for new or updated functionality. But there will be times when a
hardware driver gets updated and the update breaks a piece of
functioning hardware or doesn't solve a problem. You will want to go
back to the previous version, or "roll back" the driver. In Exercise 6, you will learn how to do a driver rollback.
Choose Start => Control Panel => Hardware And Sound => Device Manager (or type device manager in the integrated search window). Click
the triangle next to the category for which you want to roll back the
driver to expand the item list; you can also double-click the category
name (e.g., double-click Portable Devices as a category to see the
portable devices connected to the machine). Right-click the hardware item (e.g., Cannon PowerShot A550 as an item) and select Properties. Click
the Roll Back Driver button. Note that if the Roll Back Driver button
is grayed out, there isn't a previous version of the driver available. The previous driver will be installed and the hardware will return to its previous state of functionality.
|
The Driver tab for a piece of
installed hardware in Device Manager also provides functionality for
disabling and uninstalling a driver. Why would you want to disable a
driver? There are several possibilities, but troubleshooting is one of
the most common reasons.
Disabling the driver
effectively disables the hardware; it will no longer function as
designed. Uninstalling the device driver also has a similar effect, but
if the hardware is still installed, you can uninstall and perform a scan
to ensure that the hardware is stilt recognized and induce a
reinstallation.
I have often disabled a device
from Device Manager to eliminate one part of an issue I am having with a
system. If I'm confident that the problem is with the hardware, I will
uninstall the driver and let the operating system reinstall it as part
of the troubleshooting procedure. This works much of the time and is a
good place to start. In Exercise 7, you will disable and enable a device driver.
Choose Start => Control Panel => Hardware And Sound => Device Manager (or type device manager in the integrated search window). Click
the triangle next to the appropriate category to expand the item list;
you can also double-click the category name (e.g., double-click Portable
Devices to see the portable devices connected to the machine). Right-click
the hardware item (e.g. Cannon PowerShot A550) and select Properties.
Note that you can select Disable directly from the context menu if
desired. Click
the Disable button. (This is a toggle button; it will be labeled
Disable if the device is enabled and Enable if the device is disabled.) The
device driver and hence the device will be disabled and will no longer
function. There will be a down arrow on the item in Device Manager and
the General tab will show the device disabled. Close the properties
dialog box for that device. Right-click the hardware item (e.g. Cannon PowerShot A550) and select Properties. Click
the Enable button. (This is a toggle button; it will say Enable if the
device is disabled, or Disable if the device is enabled.) The device driver will become enabled and the hardware will work as designed (barring any other issues). Close Device Manager.
|
It may be beneficial at
times to uninstall and reinstall a device driver. Many times when you
uninstall and reinstall a device driver, the default configuration
parameters will be reset to their original specifications.
Any changes you have made
will need to be reconfigured, but if the device driver worked previously
and has stopped for some unknown reason (if you knew the reason, you'd
simply fix it, eh?), uninstalling and reinstalling is worth a try. You
may also consider using a different device driver than Windows 7 is set
up to use via Plug and Play.
Uninstalling the device
driver and manually installing a different version may be a solution as
well. It should be noted here that uninstalling a device driver does not
delete the driver files from the machine; uninstalling the device
drivers removes the operating system configuration for the hardware.
You may want or need to find
the files and delete them manually in some cases. Remember, you can find
the files (and thus the filenames) from Driver Details found within the
Driver tab of the Properties dialog box of the hardware from Device
Manager.
If you have determined that
the device driver for your misbehaving hardware is potentially causing
the problem you are having, you can decide to uninstall and reinstall
(automatically) the drivers. In Exercise 8, you will uninstall and then reinstall a device driver.
Choose Start => Control Panel => Hardware And Sound => Device Manager (or type device manager in the integrated search window). Click
the triangle next to category for the device you want to uninstall to
expand the item list; you can also double-click the category name (e.g.,
double-click Portable Devices to see the portable devices connected to
the machine). Right-click
the hardware item (e.g. Cannon PowerShot A550) and select Properties,
Note that you can select Uninstall directly from the context menu. Click the Uninstall button. Click
OK in the Confirm Device Uninstall dialog box. A progress box appears
as the device driver is uninstalled. Once the driver is uninstalled.
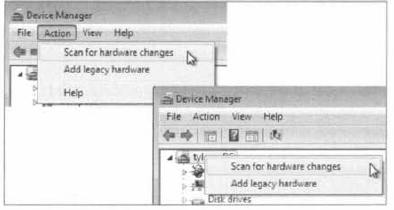
Device Manager will no longer show it. From
Device Manager, choose the Action menu item and select Scan For
Hardware Changes; alternatively, you can right-click the machine name in
Device Manager and select Scan For Hardware Changes from the context
menu.
Windows
7 will initiate the process of discovering the Plug and Play device and
will reinstall the device driver configuration into the operating
system. The hardware will be available again within Device Manager.
|
A lot of hardware
manufacturers would like you to install the driver files and some
software for their device before the operating system has a chance to
discover it. This may be just so the software program controlling some
of the hardware functionality will be installed first so its
configuration file can accurately reference the installed drivers, or it
could be to add the driver files to the driver configuration
directories of the operating system before the operating system
discovers the device.
This is usually done by
inserting and running a setup program from a provided CD or DVD. I will
say the hardware vendors know what's best. As an Admin, it's sometimes
hard not to just install the hardware and go from there, but following
the vendor's recommendations will most often produce a better result.
There are also situations
we run into requiring a manual installation of hardware. This may be
for legacy hardware you are using, for drivers not supplied in the
operating system distribution files, or drivers which may perform
different functions from the default drivers available. You can also do
this within Windows 7, from Device Manager through the Add Hardware
Wizard.
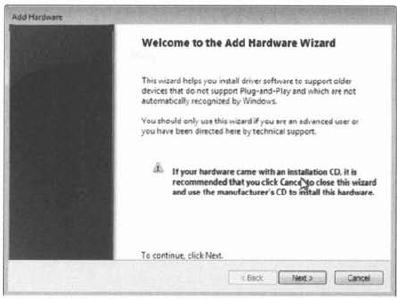
In the manual
installation process, you can have Windows 7 go out to the internet to
find a current driver, or you can specify a location of your choosing
locally. From Device Manager you launch the Add Hardware Wizard by
choosing Add Legacy Hardware from either the Action menu or the context
menu of the machine as shown in Figure 12.
The next step is to tell Windows 7 where to look for the driver. This is the next page of the Add Hardware Wizard, as Figure 13 shows.
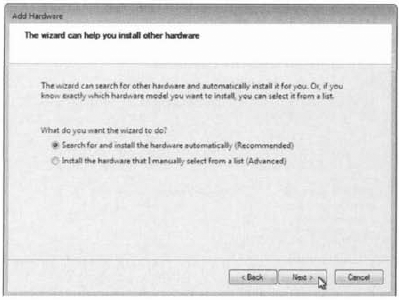
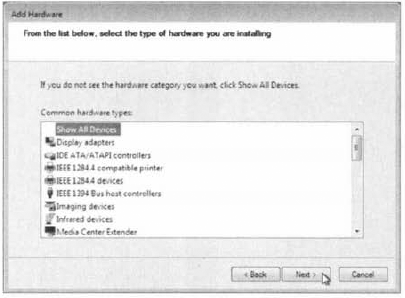
To choose a piece of hardware
from a list of supplied drivers or, more importantly* to choose a
specific path, select the option Install The Hardware That I Manually
Select For A List (Advanced) and choose Next. This allows you select a
device or choose Show Ail Devices (Figure 14); the Show All Devices choice and Next will give you the ability to choose a location.
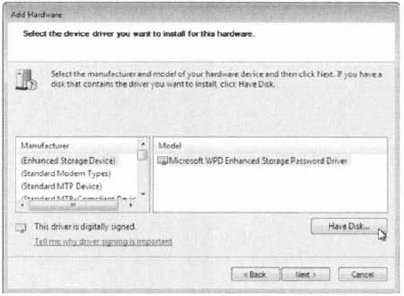
If you have a disk or have the appropriate drivers stored in an accessible location, click the Have Disk button (as seen in Figure 15)
and browse to the driver files you need to install. If all goes as
planned, the hardware device drivers will be installed and Device
Manager will display the newly installed hardware.
4. Driver Signing
In this world of hackers and
viruses, one issue that needs to be addressed is the possibility that
drivers that are downloaded have viruses or worms.
To help combat this
problem, drivers that are created from reputable companies (like Dell,
Compaq, etc.) assign a digital file certificate to the driver to show
its validity.
One way to verify that all the
drivers on your machine are verified is to run the Sigverif.exe from
the Search Programs and Files box on the Start menu. When you run the
Sigverif.exe program, the program will verify that all drivers on the
machine are verified.
Exercise 9 walks you through the steps of verifying the drivers on your machine.
Run the Sigverif.exe program by clicking Start and typing Sigverif.exe in the Search Programs And Files box and then pressing Enter. The File Signature Verification box appears. Click Start.
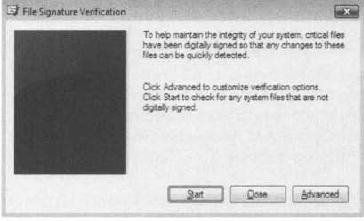
You will notice that the system scan begins. When the system is finished verifying the drivers, a message will appear. Click OK.
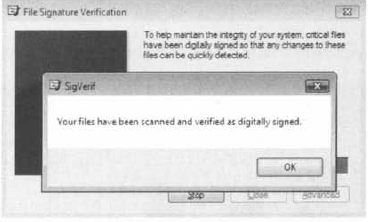
If
there are any programs with unsigned drivers, they will be displayed at
this time. Click Close to close the Sigverif.exe program.
|
Knowing how to properly
install and configure drivers is an important part of an IT
professional's job. Another task that we must perform is managing
input/output devices.